Feedback Form
|
|
Start of Tutorial > Start of Trail > Start of Lesson |
Search
Feedback Form |
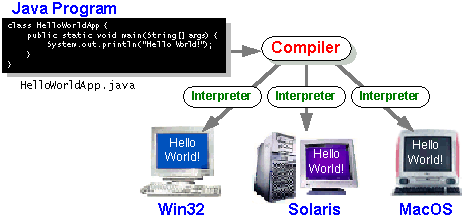
for Your First ProgramThe following instructions will help you write your first Java program. These instructions are for users of UNIX-based platforms, including Linux and Solaris.
1. A Checklist 2. Creating Your First Application
a. Create a Java Source File
b. Compile the Source File
c. Run the Program3. Creating Your First Applet 4. Where to Go from Here To write your first program, you will need:
1. A ChecklistThese two items are all you need to write your first Java program.
- The JavaTM 2 Platform, Standard Edition. You can download the Solaris or Linux version
. (Make sure you download the SDK, not the JRE.) Consult the Solaris installation instructions
- A text editor. In this example, we'll use Pico, an editor available for many UNIX-based platforms. You can easily adapt these instructions if you use a different text editor, such as Vi or Emacs.
a. Create a Java Source File.
You have two options:
- You can save the file
on your computer and avoid a lot of typing. Then, you can go straight to step b.HelloWorldApp.java
- Or, you can follow these (longer) instructions:
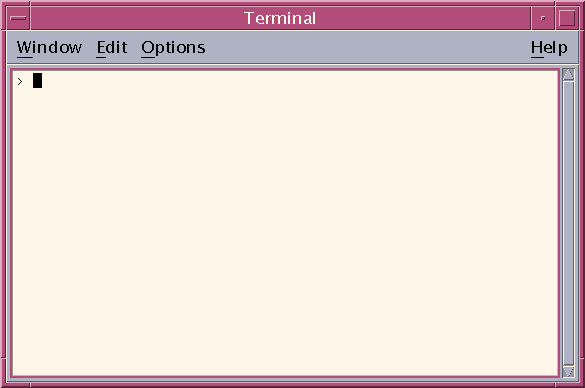
1. Bring up a shell (sometimes called terminal) window. When the window comes up, it should look like this:
When you first bring up the prompt, your current directory will usually be your home directory. You can change your current directory to your home directory at any time by typing
cdat the prompt and then pressing Return.The Java files you create should be kept in a separate directory. You can create a directory by using the command
mkdir. For example, to create the directoryjavain your home directory, you would first change your current directory to your home directory by entering the following command:
cdThen, you would enter the following command:
mkdir javaTo change your current directory to this new directory, you would then enter:
cd javaNow you can start creating your source file.
2. Start the Pico editor by typing
picoat the prompt and pressing Return. If the system responds with the messagepico: command not found, then Pico is most likely unavailable. Consult your system administrator for more information, or use another editor.When you start Pico, it'll display a new, blank buffer. This is the area in which you will type your code.
Pico? VI? Emacs? Pico is probably the easiest of the three editors to use. If you're curious about how to use the other editors, however, check out these handy reference cards for Vi
3. Type the following code into the new buffer:
/**
 * The HelloWorldApp class implements an application that
 * simply displays "Hello World!" to the standard output.
 */
class HelloWorldApp {
    public static void main(String[] args) {
        System.out.println("Hello World!"); // Display "Hello World!"
    }
}
Be Careful When You Type 
Type all code, commands, and file names exactly as shown. The Java compiler and interpreter are case-sensitive, so you must capitalize consistently.
HelloWorldApphelloworldapp
4. Save the code by typing Ctrl-O. At the bottom, you will see the prompt
File Name to write:. EnterHelloWorldApp.java, preceded by the directory in which you wish to the create the file. For example, if you wish to saveHelloWorldApp.javain the directory/home/rortigas/java, then you would type/home/rortigas/java/HelloWorldApp.javaand press Return.You can type Ctrl-X to exit Pico.
top
b. Compile the Source File.
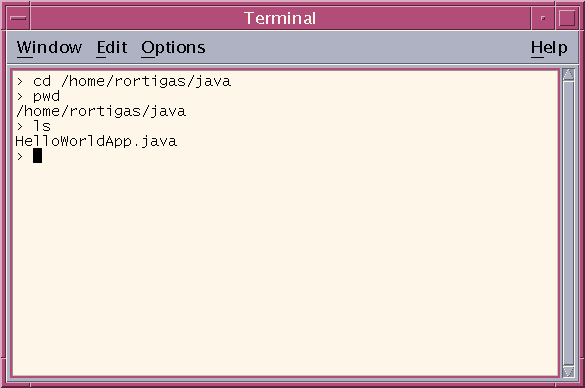
Bring up another shell window. To compile your source file, change your current directory to the directory where your file is located. For example, if your source directory is
/home/rortigas/java, you would type the following command at the prompt and press Return:
cd /home/rortigas/javaIf you enter
pwdat the prompt, you should see the current directory, which in this example has been changed to/home/rortigas/java.If you enter
lsat the prompt, you should see your file.
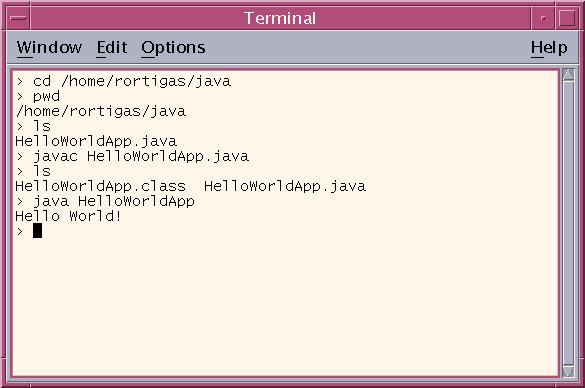
Now you can compile. At the prompt, type the following command and press Return: If your prompt reappears without error messages, congratulations. You have successfully compiled your program.
javac HelloWorldApp.java
Error Explanation
javac: Command not foundIf you receive this error, UNIX cannot find the Java compiler,
javac.Here's one way to tell UNIX where to find
javac. Suppose you installed the Java 2 Software Development Kit in/usr/local/jdk1.4. At the prompt you would type the following command and press Return:Note: If you choose this option, each time you compile or run a program, you'll have to precede your/usr/local/jdk1.4/javac HelloWorldApp.javajavacandjavacommands with/usr/local/jdk1.4/. To avoid this extra typing, consult the installation instructions for SolarisThe compiler has generated a Java bytecode file,
HelloWorldApp.class. At the prompt, typelsto see the new file that was generated:
Now that you have a
.classfile, you can run your program.
c. Run the Program.
In the same directory, enter at the prompt:
java HelloWorldAppNow you should see:
Congratulations! Your program works.
Error Explanation
Exception in thread "main" java.lang.NoClassDefFoundError:
                    HelloWorldApp
If you receive this error,
javacannot find your bytecode file,HelloWorldApp.class.One of the places
javatries to find your bytecode file is your current directory. So, for example, if your bytecode file is in/home/rortigas/java, you should change your current directory to that. To change your directory, type the following command at the prompt and press Return:cd /home/rortigas/javaIf you enter
pwdat the prompt, you should see/home/rortigas/java. If you enterlsat the prompt, you should see your.javaand.classfiles. Now enterjava HelloWorldAppagain.If you still have problems, you might have to change your CLASSPATH variable. To see if this is necessary, try "unsetting" the classpath with the following command:
Now enterunset CLASSPATHjava HelloWorldAppagain. If the program works now, you'll have to change your CLASSPATH variable. For more information, consult the section Check the CLASSPATH Variable
3. Creating Your First Applet
HelloWorldAppis an example of a Java application, a standalone program. Now you will create a Java applet calledHelloWorld, which also displays the greeting "Hello world!". UnlikeHelloWorldApp, however, the applet runs in a Java-enabled Web browser such as HotJava, Netscape Navigator, or Microsoft Internet Explorer.To create this applet, you'll perform the basic steps as before: create a Java source file; compile the source file; and run the program.
a. Create a Java Source File.
Again, you have two options:
- You can save the files
HelloWorld.javaand
Hello.htmlon your computer and avoid a lot of typing. Then, you can go straight to step b.
- Or, you can follow these instructions:
1. Start Pico. Type the following code into a new buffer:
import java.applet.*;
import java.awt.*;

/**
 * The HelloWorld class implements an applet that
 * simply displays "Hello World!".
 */
public class HelloWorld extends Applet {
    public void paint(Graphics g) {
        g.drawString("Hello world!", 50, 25); // Display "Hello world!"
    }
}
Save this code to a file called
HelloWorld.java. Type Ctrl-X to exit Pico.2. You also need an HTML file to accompany your applet. Start Pico again and type the following code into a new buffer:
<HTML>
<HEAD>
<TITLE>The Hello World Applet</TITLE>
</HEAD>
<BODY>
<APPLET CODE="HelloWorld.class" WIDTH=150 HEIGHT=25>
</APPLET>
</BODY>
</HTML>
Save this code to a file called
Hello.html. Type Ctrl-X to exit Pico.
b. Compile the Source File.
At the prompt, type the following command and press Return:
javac HelloWorld.javaThe compiler should generate a Java bytecode file,
HelloWorld.class.
c. Run the Program.
Although you can view your applets using a Web browser, you may find it easier to test your applets using the simple
appletviewerapplication that comes with the JavaTM Platform. To view theHelloWorldapplet usingappletviewer, enter at the prompt:
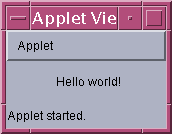
appletviewer Hello.htmlNow you should see:
Congratulations! Your applet works.
4. Where to Go from Here
To continue your introduction to the Java programming language, check out these trails:
Getting Started 
Learning the Java Language If you have feedback on these instructions -- whether you love them or had trouble following them -- please tell us.
|
|
Start of Tutorial > Start of Trail > Start of Lesson |
Search
Feedback Form |
Copyright 1995-2002 Sun Microsystems, Inc. All rights reserved.